
 Services
 Portfolio
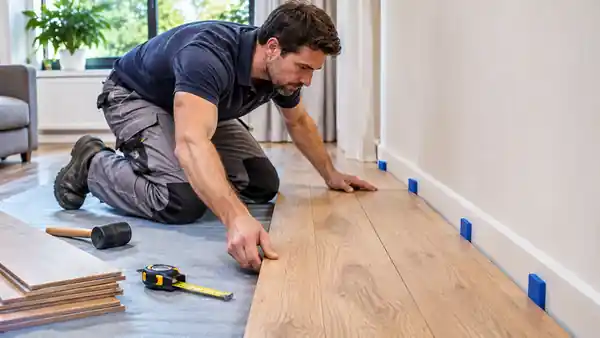
A laminate flooring expansion gap is the small clearance left between a floating floor and fixed surfaces such as walls, door frames, pipes and built-in features. It gives the floor room to respond to changes in temperature and humidity. If the edge is trapped, planks can press against one another, lift or develop open joints. If the gap is too large or poorly finished, it can remain visible and look unfinished.
The correct clearance is not a universal number for every laminate product. It depends on the flooring system, room dimensions, layout and the manufacturer’s installation instructions. Renova Creative lists laminate flooring among its home improvement services in Den Haag. This guide explains how to plan and maintain the gap, where to leave it, and how to finish the perimeter without restricting the floor.
Why a laminate flooring expansion gap matters
Most click laminate is installed as a floating floor. The planks connect to one another, but the assembled surface is not normally fixed rigidly to the subfloor or walls. This lets the floor move as the building environment changes. The laminate core can respond to variations in moisture and temperature, so the size of the installed surface and the conditions in the room matter.
Without enough clearance, the floor can become constrained at its edges. Expansion pressure may cause raised joints, peaking, buckling or movement in the locking connections. A floor that is tightly wedged beneath a door frame or trapped by a kitchen unit can experience the same problem even when the visible wall gap appears correct.
The gap is a functional part of the floating floor; finishing trims should conceal it without blocking movement.
How wide should the laminate flooring expansion gap be?
Use the exact measurement stated in the installation instructions for the laminate you are fitting. Do not copy a measurement from another brand, an online forum or a previous job. Manufacturers may specify different clearances according to the product construction, room size, humidity range and installation layout.
For example, the Quick-Step standard laminate installation manual specifies an expansion joint of 8–10 mm around the perimeter, including around pipes, thresholds and under doors. It also describes an intermediate joint for installations where both the length and width exceed 13 metres. Those figures apply to the instructions for that product range; they should not be treated as a universal specification for every laminate floor. Read the current manual for the exact product before setting spacers.
Check whether the instructions measure the gap from the plank edge, the wall finish or another reference point. Also confirm whether the stated clearance changes for unusually large rooms, connected spaces, irregular layouts or higher humidity conditions. When the documentation is unclear, ask the flooring supplier or manufacturer for the correct detail before cutting the first row.
Where the gap is needed
The perimeter clearance must remain continuous wherever the floating floor meets a fixed obstruction. A neat gap along the straight wall is not enough if the flooring is tight around a pipe, doorway or built-in fitting. The laminate flooring expansion gap must be preserved at each of these points, not only along the most visible wall.
Perimeter expansion clearance at walls and fixed edges
Leave the specified space between the laminate and every wall. Check both sides of the room, including narrow alcoves, chimney breasts, recesses and the final row. Walls are not always perfectly straight, so measure the clearance at several points rather than relying on one spacer at the end of a long run.
Also check fixed edges such as columns, hearths, door thresholds and the base of fitted units. A floating floor should not be wedged tightly against a fixed surface. Where heavy cabinets or kitchen islands are involved, follow the flooring manufacturer’s rules about whether they must be installed before the laminate. Some systems require heavy fixed objects to remain independent of the floating floor.
Expansion space at doorways and thresholds
Doorways need particular attention because they connect separate floor areas and often contain narrow cuts. The flooring may need a clearance beneath the door leaf, against the frame and at the threshold. A transition profile can cover the joint, but it must be compatible with the floor system and must not clamp the laminate so tightly that it cannot move.
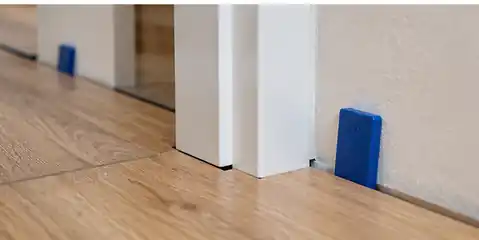
Some manufacturers require a joint between rooms; others allow continuous installation only under stated conditions. Check the rules for room dimensions, doorway width, floor thickness and environmental conditions. Do not assume a wide doorway removes the need for a joint.
Clearance around pipes and fixed objects
Radiator pipes, water pipes, columns and other fixed penetrations need room around the laminate cut-out. Measure the object and mark the opening so that the required clearance remains after the plank is positioned. A tight circular cut can trap the floor when it moves. A suitable pipe cover or flexible finishing detail can conceal the opening without bonding the laminate rigidly to the pipe.
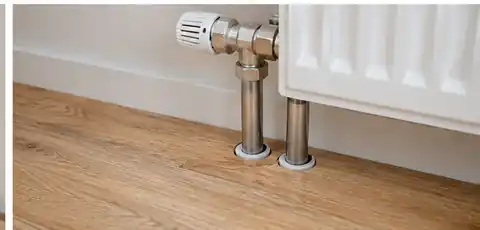
Take care around concealed heating pipes and services. Confirm their positions before drilling or cutting. If a pipe location is uncertain, stop and establish where it runs rather than risking damage to the installation or building services.
Map the room before laying the first row
Planning the gap before the first plank is laid is easier than trying to correct a trapped edge after the floor is complete. Start with the flooring instructions, a room sketch and accurate measurements. Record wall lengths, doorway positions, pipe locations, fixed cabinets and any changes in floor level.
Measure the room at several points and mark the laminate flooring expansion gap before cutting. Older walls may be out of square or bowed, so the first row may need trimming. Check the last row too: a narrow final strip can make the required clearance and click connection harder to maintain.
Think about the full installation area, not just one room. Long runs, connected rooms, L-shaped layouts and changes in direction may require intermediate movement joints or profiles. The manufacturer’s instructions determine where these are needed. A plan should also account for skirting boards, door casings and transitions so the finished detail can cover the clearance without pressing on the planks.
How to maintain a consistent laminate flooring expansion gap
Once the layout is planned, use the correct installation spacers to hold the first rows away from the wall. Spacers should match the required clearance and should sit securely without damaging the wall or plank edges.
Do not rely on a single spacer at each end. Place them at suitable intervals along the starting wall and check the line as additional rows are installed. Recheck the gap at corners, recesses and changes in wall direction. A plank can drift as click joints are connected, so inspect the perimeter regularly rather than waiting until the final row.
Use a tape measure or gauge to check several points. Correct any plank that presses against a spacer or wall, and keep debris out of the perimeter so nothing can act as a wedge.
Use spacers and recheck the perimeter
Fit the spacers specified by the flooring system. Keep the first row straight and make sure the distance from the wall remains consistent. As the floor grows, check the gap at both ends and along the exposed edges. Remove a spacer only when the installation instructions say it is safe to do so; all temporary spacers should be removed at the correct finishing stage.
Undercut door frames without trapping the floor
Where the installation method allows it, the bottom of a door casing can be undercut so the laminate slides neatly beneath it. Use an offcut of the actual floor assembly to set the cutting height, including the underlay if relevant. The cut must allow the floor to move; it should not press the plank down or hold it tightly against the frame.
Check door swing and finished floor height before cutting. If the casing cannot be undercut safely or the required clearance cannot be achieved, use the manufacturer’s approved alternative detail rather than forcing the plank into a tight opening.
Choose a finish that allows movement
The finishing material should hide the clearance while allowing the floating floor to move as designed. The skirting or profile is generally fixed to the wall, subfloor or designated support—not through the laminate—unless the product instructions specify another method.
Cover the expansion gap with skirting or a profile
Skirting boards can conceal the perimeter gap at walls. They should be fitted so that they do not clamp the laminate down. Where existing skirting is staying in place, a compatible cover strip or scotia profile may be used if it provides enough coverage and is suitable for the floor system.
At doorways and between different floor finishes, choose a transition profile designed for the difference in height and the movement requirements. Confirm how the profile is fixed and where its base channel sits. A profile that is screwed through the floating floor can restrict movement and may damage the floor as it expands or contracts.
Keep pipe details flexible
Use a pipe collar or finishing accessory sized for the opening. Where the manufacturer permits a flexible sealant or backer detail, follow the stated method and product compatibility requirements. Do not fill the entire clearance with hard grout, rigid filler or ordinary construction adhesive. A rigid bridge can prevent the floor from moving and transfer stress to the click joints.
What happens when the expansion gap is too small?
An undersized or blocked gap can show up as a raised edge, a ridge across the floor, joints that open, clicking sounds or planks that separate. These symptoms can also have other causes, including an uneven subfloor, damaged locking profiles, moisture problems or incorrect underlay. Do not assume every raised plank is caused by the perimeter gap alone.
Inspect the room edges and fixed objects first. Look for skirting that presses on the floor, tight cuts around pipes, flooring trapped beneath cabinets, or a transition profile that is fixed through the planks. Check whether the floor has been exposed to moisture or whether the subfloor was within the manufacturer’s flatness and moisture limits before installation.
If the floor has already buckled, avoid forcing it flat or cutting a random section from the edge. Identify the cause and consult the flooring instructions or a competent flooring installer. Removing a small amount of material without checking the full installation can leave an inconsistent gap or damage the locking system.
Common mistakes to avoid
- Using one measurement for every brand: the correct clearance is product-specific.
- Measuring only the straight walls: door frames, pipes, columns and fixed units also need attention.
- Forgetting the final row: a tight cut can eliminate the required movement space.
- Leaving spacers in place: temporary spacers must be removed at the stage specified by the manufacturer.
- Fixing skirting through the floor: this can clamp the floating surface and restrict movement.
- Filling the gap with rigid material: hard grout or adhesive can create a fixed bridge.
- Ignoring connected rooms: large or irregular floor areas may need intermediate joints or profiles.
- Assuming the gap caused every defect: moisture, subfloor flatness and damaged click joints also need investigation.
Laminate flooring installation checklist
Before starting, keep the product instructions available and confirm the following. Recheck the laminate flooring expansion gap at the walls, doorway edges and pipe cut-outs before fitting the finishing trims:
- The laminate model and its current installation manual have been identified.
- The required perimeter gap and any intermediate-joint rules have been recorded.
- The subfloor is clean, dry, firm and within the stated flatness limits.
- Room dimensions, doorways, pipes, columns and fixed units have been measured.
- Skirting and transition details will cover the gap without trapping the floor.
- Suitable spacers, cutting tools and compatible profiles are ready.
- The finished floor height will not prevent doors from opening or create unsafe transitions.
- All spacers will be removed at the correct stage and the floor will be checked for free movement.
For a product-specific example, consult the Quick-Step laminate installation instructions. They illustrate why the clearance must be maintained around walls, pipes, thresholds and doorways. Always use the current manual supplied for the exact floor being installed.
When to ask a flooring professional
Ask a flooring professional for advice when the layout is complex, the floor run is long, fixed units or underfloor heating are involved, or the subfloor is damp, unstable or outside the stated flatness tolerance. Resolve these issues before installation.
Renova Creative lists laminate flooring as part of its home improvement services. Review the services available from Renova Creative and use the contact page to discuss the scope of a flooring project in Den Haag. The appropriate installation detail should always be confirmed against the selected flooring product.
FAQs about laminate flooring expansion gaps
Can I use the same expansion gap for every laminate floor?
No. Follow the installation instructions for the exact product. The required clearance can vary with the floor system, room dimensions and installation conditions.
Should I leave a gap around radiator pipes?
Yes. Fixed penetrations need the clearance specified by the manufacturer. A suitable pipe cover can hide the opening without clamping the laminate.
Can skirting boards be fixed to the laminate?
Normally, skirting is fixed to the wall so the floating floor can move beneath it. Check the product instructions before choosing a different fixing method.
Do I need a movement joint between rooms?
It depends on the flooring system and the layout. Some products require a joint between rooms; others specify conditions for continuous installation. Check the current manufacturer guidance.
Can I fill an expansion gap with silicone?
Only use a flexible finishing method if the flooring manufacturer approves it for that location. Do not fill the gap with rigid grout, filler or adhesive.
What should I do if laminate flooring starts to lift?
Check for trapped edges, tight profiles, moisture and subfloor problems. Do not cut or force the floor without identifying the cause; ask a flooring professional if the source is unclear.
A well-planned laminate flooring expansion gap is easy to overlook because it disappears beneath the finishing trim. Yet it is essential to the way a floating floor works. Measure the room, follow the exact product instructions, maintain clearance around every fixed object and finish the edges without locking the floor in place.
